Introduction
In an earlier post, we discussed how to plot a histogram using python. A histogram is one of the 7 basic tools of quality control. So is a scatter plot. Today, we will be discussing how to draw a scatter plot using python. The module we are using for this is called matplotlib which is a popular third-party module for data visualization. We’ll be briefly discussing theory and practical use of scatter plots whilst learning to plot them using python.
Cartesian coordinate system
Before learning scatter plots, it is important to first understand the cartesian coordinate system. Although one might already have desirable knowledge, we’re reviewing them for the sake of completeness.
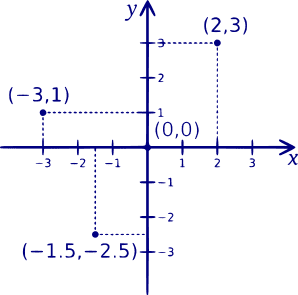
The cartesian coordinate system can be either a plane (2D) or space (3D). We are only concerned about the 2D cartesian plane which is used to create scatter plots (yes, 3D scatter plots also exist). A 2D cartesian plane contains an origin point that has coordinates (0,0). Both x and y-axis are divided into equal intervals which are readily marked. Hence, any point in the cartesian coordinate system can be represented by values in the x and y-axis. The below image depicts a 2D cartesian coordinate system.
Scatter plot
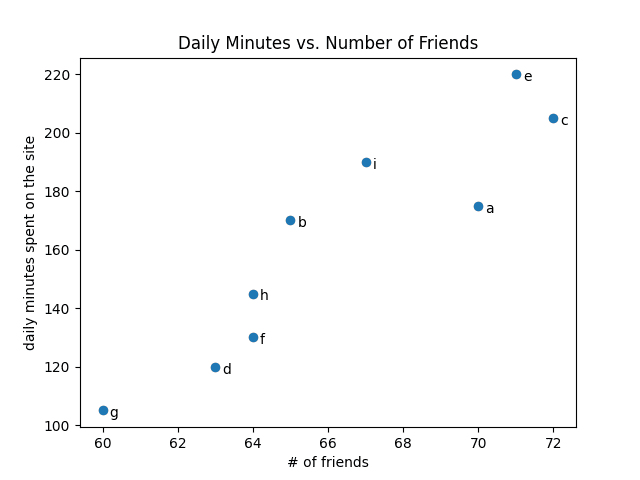
A scatter plot takes advantage of the 2D cartesian system. In a scatter plot, two variables one along the x-axis and the other along the y-axis are marked. The position of points in the scatter plot is determined by the values of these variable. Hence, a scatter plot helps us grasp the relationship between these variables. Normally, the variable that’s marked along the x-axis is a continuous and independent variable. Below, we show a simple scatter plot that demonstrates the relationship between the number of friends a user has on his social media account and the amount of time they spent on the site.
The y-axis indicates the amount of time in minutes a user spent on the site. The x-axis indicates the number of friends the user has. All the small alphabet labels indicate the name of the user we are looking at. For example, user b has 65 friends and they spend 170 minutes on-site each day. We will be learning to plot this in the coming sections.
Uses of scatter plot
- To observe the relationship between two variables
- To identify patterns in data.
Scatter plot vs line chart
One might think why we need both a scatter plot and a line chart. A line chart is simply connecting all the dots with a straight line. Both are used to understand the relation between two variables. However, they have fundamental differences. In a line chart, one of the variables is continuous and the other’s value is dependent on it. However, in a scatter plot, both variables are typically independent of each other. Any relation that exists between them might exist through a third variable. A scatter plot can help us reveal such relations.
Drawing scatter plot using python
Drawing a scatter plot using python is very simple thanks to the matplotlib module. We will be following a step-by-step process. One can find the complete program in the end.
STEP 1: Import pyplot method from matplotlib
import matplotlib.pyplot as pltUsing plt as a short form for pyplot method has somewhat become pythonic.
STEP 2: Create the list of variable values
friends = [70, 65, 72, 63, 71, 64, 60, 64, 67]
minutes = [175, 170, 205, 120, 220, 130, 105, 145, 190]
The first list indicates the number of friends a user has. The second list indicates the amount of time (in minutes) they collectively spent on our site. We are trying to observe the relationship between the two variables. Ideally, the more friends one has, the more time they should be spending collectively.
STEP 3: Creating a list of labels
labels = ['a', 'b', 'c', 'd', 'e', 'f', 'g', 'h', 'i']These are the names of our users. We are giving them alphabets for simplicity’s sake.
STEP 4: Generating the scatter plot
plt.scatter(friends, minutes)The first argument is passed for the x-axis and the second one is for the y-axis.
STEP 5: Annotating the dots
for label, friend_count, minute_count in zip(labels, friends, minutes):
    plt.annotate(label, xy=(friend_count, minute_count), xytext=(5, -5), textcoords='offset points')
zip() creates a new list containing values of labels, friends, and minutes as tuples. These values will be passed to the variables label, friend_count, minute_count during each iteration. The plt.annotate method annotates the dots accordingly.
plt.annotate has 3 arguments. The first argument is the label which is the username. The second argument passes the coordinates where the label will be placed. We can see that plt.scatter took the same coordinates hence all the labels will be placed on top of the dots.
But for visual reasons, it is better slightly offset the labels. So we pass xytext=(5, -5) as argument which offset the label by 5 units to the right and 5 units down.
textcoords=‘offset points’ is provided to achieve relative positioning of the labels. So the dot itself will be treated as the origin point while placing the label. Without textcoords=‘offset points’ we will have to give the absolute position of our label.
STEP 6: Providing title and label
plt.title("Daily Minutes vs. Number of Friends")
plt.xlabel("# of friends")
plt.ylabel("daily minutes spent on the site")
Everything in the above code is hopefully self-explanatory.
STEP 7: Simply call plt.show()
plt.show()Here is the complete code.
import matplotlib.pyplot as plt
friends = [70, 65, 72, 63, 71, 64, 60, 64, 67]
minutes = [175, 170, 205, 120, 220, 130, 105, 145, 190]
labels = ['a', 'b', 'c', 'd', 'e', 'f', 'g', 'h', 'i']
plt.scatter(friends, minutes)
for label, friend_count, minute_count in zip(labels, friends, minutes):
    plt.annotate(label, xy=(friend_count, minute_count), xytext=(5, -5), textcoords='offset points')
plt.title("Daily Minutes vs. Number of Friends")
plt.xlabel("# of friends")
plt.ylabel("daily minutes spent on the site")
plt.showhow()
Drawbacks of scatter plots
- Overplotting is a common issue when we try to create scatter plots. This is especially true when the data is really big. In such cases, it becomes hard to understand the relationship between two points.
- When we observe a scatter plot, we tend to think that value of one variable is affecting the value of the other. That is not necessarily true. However, it’s hardcoded in our brains to think so. This is a drawback caused by interpretation rather than the plot itself.

