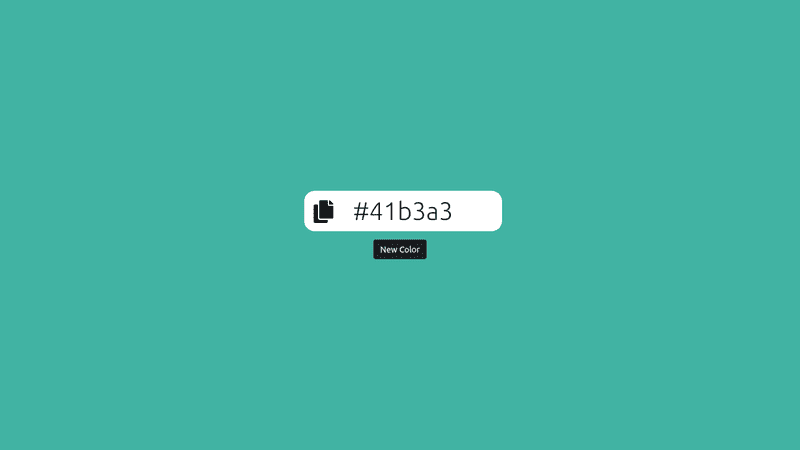
A random color generator is one of the first projects I did when I started learning JavaScript. Today I thought I will do something different by recreating the random color generator with slight modifications. I will cover everything - html, css, and js.
Folder structure
The folder structure for our project is very simple. We have a folder Random Color Generator and three files index.html, index.css, and index.js.
HTML
The html of our project mainly contains 3 elements.
- A button that will change the background color
- A paragraph that shows the random color's hex code
- A clipboard icon that shows the copy status
CSS
The CSS is very basic and mainly contains code for positioning.
JavaScript
In JavaScript, we have
- A function to set initial color on load
- A function to generate random color
- A function to copy to clipboard
Let's go
Okay, I assume you have your folder structure ready. Start by setting up our html file boilerplate in index.html (notice I changed the title).
<!DOCTYPE html>
<html lang="en">
  <head>
    <meta charset="UTF-8" />
    <meta http-equiv="X-UA-Compatible" content="IE=edge" />
    <meta name="viewport" content="width=device-width, initial-scale=1.0" />
    <title>Random Color Generator</title>
  </head>
  <body></body>
</html>
We will use bootstrap and font awesome icon pack for this project. So we will add their CDN links in the <head> section.
<head>
  ...
  <link
    href="https://cdn.jsdelivr.net/npm/bootstrap@5.0.2/dist/css/bootstrap.min.css"
    rel="stylesheet"
    integrity="sha384-EVSTQN3/azprG1Anm3QDgpJLIm9Nao0Yz1ztcQTwFspd3yD65VohhpuuCOmLASjC"
    crossorigin="anonymous"
  />
  <link
    href="https://cdnjs.cloudflare.com/ajax/libs/font-awesome/5.15.4/css/all.min.css"
    rel="stylesheet"
    crossorigin="anonymous"
  />
  ...
</head>
We'll also need to connect our index.css and index.js files.
<head>
  ...
  <link href="/index.css" rel="stylesheet" />
  <script src="/index.js"></script>
  ...
</head>
Inside the body, we will create the three elements that were already mentioned.
Start with a div container with class content.
<body>
  <div class="content"></div>
</body>
Inside the content div, we create another div which contains our font awesome icon and the paragraph element.
<body>
  <div class="content">
    <div>
      <i class="fas fa-copy" id="copy"></i>
      <p class="display-5 title" id="title"></p>
    </div>
  </div>
</body>
The way to use font awesome icons is by using <i> tag. The classes fas and fa-copy is referring to font awesome's clipboard icon.
The display-5 class is a bootstrap class that provides a nice heading look for our paragraph. Rest of the ids & classes are just for CSS or DOM.
Finally, add the button element.
<body>
  <div class="content">
    <div>
      <i class="fas fa-copy" id="copy"></i>
      <p class="display-5 title" id="title"></p>
    </div>
    <button type="button" class="btn btn-dark" id="btn">New Color</button>
  </div>
</body>
Once again we have bootstrap classes btn and btn-dark. We will come back to index.html once we are done with the CSS and JavaScript files.
Update index.css with the following code.
body,
html {
  height: 100%;
  width: 100%;
  display: grid;
}

.content {
  text-align: center;
  margin: auto;
}

.title {
  display: inline-block;
  text-align: center;
  background-color: white;
  border-radius: 20px;
  min-width: 380px;
  padding: 10px;
  cursor: default;
}

.fa-copy {
  color: black;
  font-size: 5vh;
  z-index: 99;
  position: relative;
  left: 60px;
  margin-left: -30px;
}

@media only screen and (max-width: 600px) {
  .title {
    min-width: 300px;
  }
}
Since this is basic, I don't want to go to details. Essentially the code centers the content and provides some default colors.
In index.js, we start by defining an array.
const hex = [0, 1, 2, 3, 4, 5, 6, 7, 8, 9, "a", "b", "c", "d", "e", "f"]This array contains all the 16 characters that can be used in a hex code. We will use the array to generate random hex codes.
Next, we will create a variable to store default hex code value.
let hexcode = "#41b3a3"This variable will define the color on load. Notice the keyword is let. We want to change this variable on button click.
Now we need to define 3 functions. First one to set the initial color.
function initialColor() {
  document.body.style.background = hexcode
  document.getElementById("title").innerHTML = hexcode
}
When this function runs, background color will change to the value in hexcode. The paragraph will also be displaying the same. Please remember that we need to run this function on window load.
Next, we need a function to generate random hex codes.
function colorGenerator() {
  const hexarray = []

  for (i = 0; i < 6; i++) {
    const random = Math.floor(Math.random() * 16)
    hexarray.push(hex[random])
  }
  hexcode = "#" + hexarray.join("")
  document.body.style.background = hexcode
  document.getElementById("title").innerHTML = hexcode
  document.getElementById("copy").style.color = "black"
}
We define an empty array and use for loop to push 6 random characters from the hex array. Math.random() generates random numbers between 0 and 1. We multiply it by 16 and do floor division. This makes sure we are getting a random number between 0 and 15 which is being used as the index.
The join method joins elements in an array and returns a string. The joint operator is provided in the parenthesis which in this case is an empty string. We reassign hexcode variable with the new value and do necessary DOM manipulation.
Finally, we need to define the function for copying to clipboard.
function copy() {
  const copyText = document.getElementById("title").innerHTML
  navigator.clipboard.writeText(copyText)
  document.getElementById("copy").style.color = hexcode
}
This function copies the text inside the paragraph element and save it in clipboard. It also changes the color of clipboard icon to the copied color. That will serve as an indication that the hex code is now saved in clipboard.
Back in index.html, I want to do three things.
- Run
initialColor()on load - Run
colorGenerator()on button click - Run
copy()on mouse hover to the paragraph element
To run initialColor() on load, we add it to the body tag using onload property.
<body onload="initialColor()">
  ...
</body>
To run colorGenerator() on button click, we add it to the button element using onclick property.
<button type="button" class="btn btn-dark" onclick="colorGenerator()" id="btn">
  New Color
</button>
Finally, for the copy(), we add it to paragraph element using onmouseenter property.
<p class="display-5 title" id="title" onmouseenter="copy()"></p>When our mouse enters the pargraph element, it will trigger the copy(). You can see the changes in the clipboard icon.
Once again, here is the source and the demo.
Bye :)

